2024. 11. 27. 10:27ㆍ컴퓨터비전&AI
- 이동
import cv2
import numpy as np
img = cv2.imread('images/fish.jpg')
rows, cols = img.shape[0:2]#2차원
dx, dy = 100, 50# x로 100, y로 50만큼 이동
mtrx = np.float32([[1, 0, dx], [0, 1, dy]])#행렬로 만들어줌
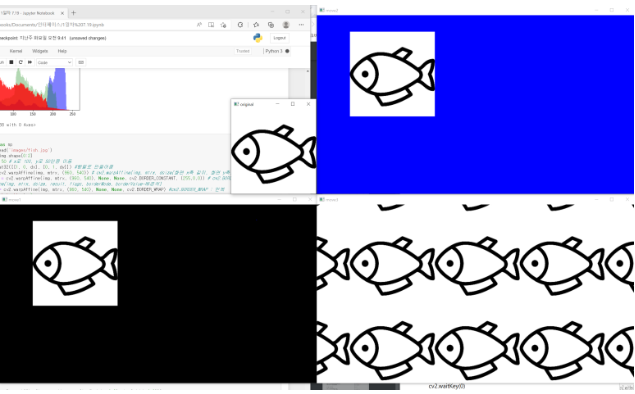
move_basic = cv2.warpAffine(img, mtrx, (960, 540))# cv2.warpAffine(img, mtrx, dsize(화면 x축 길이, 화면 y축길이))
move_constant = cv2.warpAffine(img, mtrx, (960, 540), None, None, cv2.BORDER_CONSTANT, (255,255,255)) # cv2.BORDER_CONSTANT : 고정 색상
#cv2.warpAffine(img, mtrx, dsize, result, flags, borderMode, borderValue-배경색)
move_reflect = cv2.warpAffine(img, mtrx, (960, 540), None, None, cv2.BORDER_REFLECT)#cv2. BORDER_REFLECT : 반사
cv2.imshow('original', img)
cv2.imshow('move1', move_basic)
cv2.imshow('move2', move_constant)
cv2.imshow('move3', move_reflect)
cv2.waitKey(0)
cv2.destroyAllWindows()
1-2. 이동
import cv2
import numpy as np
img = cv2.imread('images/fish.jpg')
rows, cols = img.shape[0:2]#2차원
dx, dy = 100, 50# x로 100, y로 50만큼 이동
mtrx = np.float32([[1, 0, dx], [0, 1, dy]])#행렬로 크기 비율 만들어줌
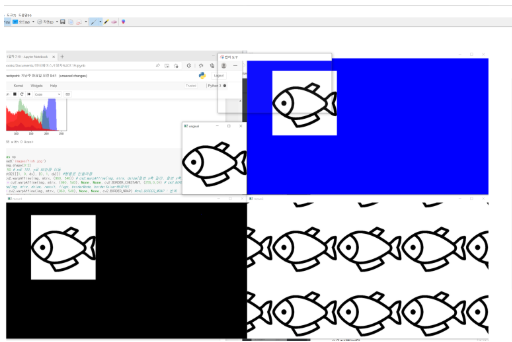
move_basic = cv2.warpAffine(img, mtrx, (960, 540))# cv2.warpAffine(img, mtrx, dsize(화면 x축 길이, 화면 y축길이))
move_constant = cv2.warpAffine(img, mtrx, (960, 540), None, None, cv2.BORDER_CONSTANT, (255,255,255)) # cv2.BORDER_CONSTANT : 고정 색상
#cv2.warpAffine(img, mtrx, dsize, result, flags, borderMode, borderValue-배경색)
move_reflect = cv2.warpAffine(img, mtrx, (960, 540), None, None, cv2.BORDER_REFLECT)#cv2. BORDER_REFLECT : 반사
cv2.imshow('original', img)
cv2.imshow('move1', move_basic)
cv2.imshow('move2', move_constant)
cv2.imshow('move3', move_reflect)
cv2.waitKey(0)
cv2.destroyAllWindows()
2-1. 행렬을 이용한 확대와 축소
import cv2
import numpy as np
img = cv2.imread('images/fish.jpg')
height, width = img.shape[:2]
small_mtrx = np.float32([[0.6, 0, 0],[0, 0.6, 0]])#행렬 이용해 크기 조절
big_mtrx = np.float32([[2, 0, 0],[0, 2, 0]])
small_basic = cv2.warpAffine(img, small_mtrx,(int(height*0.6), int(width*0.6)))
big_basic = cv2.warpAffine(img, big_mtrx,(int(height*2), int(width*2)))
small_area = cv2.warpAffine(img, small_mtrx,(int(height*0.6), int(width*0.6)),None, cv2.INTER_AREA)
#cv2.INTER_AREA : 픽셀 영역 관계를 이용한 재 샘플링
big_cubic = cv2.warpAffine(img, big_mtrx,(int(height*2), int(width*2)),None, cv2.INTER_CUBIC)
#cv2.INTER_CUBIC : 인접한 16개 픽셀 값에 거리 가중치 사용
cv2.imshow("original", img)
cv2.imshow("small_basic", small_basic)
cv2.imshow("big_basic", big_basic)
cv2.imshow("small_area", small_area)
cv2.imshow("big_cubic", big_cubic)
cv2.waitKey(0)
cv2.destroyAllWindows()

2-2. cv2.resize를 이용한 확대와 축소
import cv2
import numpy as np
img = cv2.imread('images/fish.jpg')
height, width = img.shape[:2]
small_resize = cv2.resize(img, (int(width*0.6), int(height*0.6)), None, None,None, cv2.INTER_AREA)
bic_resize = cv2.resize(img, None, None, 2, 2, cv2.INTER_CUBIC)
cv2.imshow("original", img)
cv2.imshow("small_resize", small_resize)
cv2.imshow("big", bic_resize)
cv2.waitKey(0)
cv2.destroyAllWindows()

3. cv2.getRotationMatrix2D()로 회전
import cv2
import numpy as np
img = cv2.imread('images/fish.jpg')
rows, cols = img.shape[0:2]
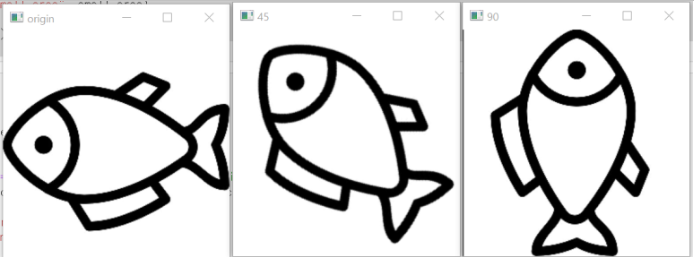
modify45 = cv2.getRotationMatrix2D((cols/2, rows/2), 45, 0.5)
#cv2.getRotationMatrix2D(물고기 위치를 가운데로, 회전각도, 물고기 크기)
modify90 = cv2.getRotationMatrix2D((cols/2, rows/2), 90, 1)
img45 = cv2.warpAffine(img, modify45,(cols, rows),
None, None, cv2.BORDER_CONSTANT, (255,255,255)) #cv2.BORDER_CONSTANT : 고정 색상
img90 = cv2.warpAffine(img, modify90, (cols, rows))
cv2.imshow('origin',img)
cv2.imshow("45", img45)
cv2.imshow("90", img90)
cv2.waitKey(0)
cv2.destroyAllWindows()

3-1. 변환행렬로 회전
import cv2
import numpy as np
img = cv2.imread('images/fish.jpg')
rows, cols = img.shape[0:2]
theta45 = 45.0 * np.pi / 180
theta90 = 90.0 * np.pi / 180
modify45 = np.float32([[np.cos(theta45), -1*np.sin(theta45), rows//2],
[np.sin(theta45), np.cos(theta45), -1*cols//4]])
modify90 = np.float32([[np.cos(theta90), -1*np.sin(theta90), rows],
[np.sin(theta90), np.cos(theta90), 0]])
rotate45 = cv2.warpAffine(img, modify45, (rows, cols),
None, None, cv2.BORDER_CONSTANT, (255,255,255))
rotate90 = cv2.warpAffine(img, modify90, (rows, cols))
cv2.imshow("origin", img)
cv2.imshow("45", rotate45)
cv2.imshow("90", rotate90)
cv2.waitKey(0)
cv2.destroyAllWindows()
4-1 뒤틀기(어파인 변환)
import cv2
import numpy as np
img = cv2.imread('images/fish.jpg')
rows, cols = img.shape[:2]
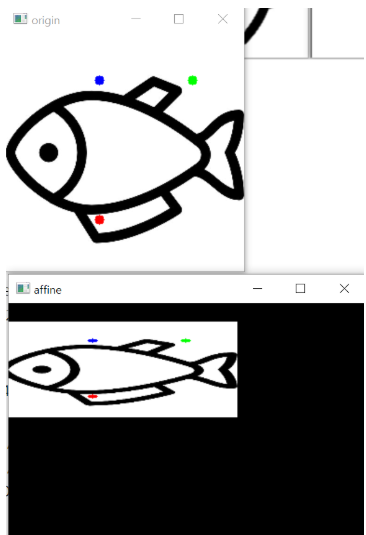
pts1 = np.float32([[100, 50], [200, 50], [100, 200]])# np.float32(파란점 좌표, 초록점 좌표, 빨간 점 좌표)
pts2 = np.float32([[90, 40], [190, 40], [90, 100]])
#3개니깐 3차원
cv2.circle(img, (100, 50), 5, (255, 0, 0), -1)#cv2.circle(img, 점 위치, 점 크기, 색 , 색 채우기)
cv2.circle(img, (200, 50), 5, (0, 255, 0), -1)
cv2.circle(img, (100, 200), 5, (0, 0, 255), -1)
mtrx = cv2.getAffineTransform(pts1, pts2)# cv2.getAffineTransform(변환 전 좌표 3개, 변환 후 좌표 3개)
dst = cv2.warpAffine(img, mtrx, (int(cols*1.5), rows))
cv2.imshow('origin',img)
cv2.imshow('affine', dst)
cv2.waitKey(0)
cv2.destroyAllWindows()
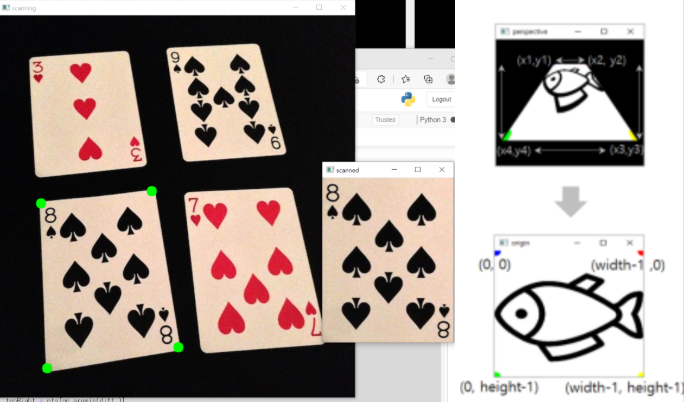
4-2. 뒤틀기 (원근변환)
import cv2
import numpy as np
win_name = 'scanning'
img = cv2.imread('images/card.jpg')
rows, cols = img.shape[:2]
draw = img.copy()
pts_cnt = 0
pts = np.zeros((4,2), dtype=np.float32)
def onMouse(event, x, y, flags, param):# 마우스 이벤트 콜백 함수 구현
global pts_cnt#마우스로 찍은 좌표개수 저장
if event == cv2.EVENT_LBUTTONDOWN:#왼쪽 버튼 눌렀을때
cv2.circle(draw, (x,y), 10, (0,255,0), -1)#좌표에 초록 동그라미 표시
cv2.imshow(win_name, draw)#영상 윈도우
pts[pts_cnt] = [x,y] #마우스 좌표 저장
pts_cnt+=1 #마우스가 하나씩 잡힘
if pts_cnt==4: #좌표가 4개 수집되면
sm = pts.sum(axis=1) #4쌍의 좌표 각각 x+y 계산
diff = np.diff(pts, axis=1) # 4쌍의 좌표 각각 x-y 계산
topLeft = pts[np.argmin(sm)] #x+y가 가장 작은 값이 최상단
bottomRight = pts[np.argmax(sm)] #x+y가 가장 큰 값이 우하단
topRight = pts[np.argmin(diff )] #x-y가 가장 작은 갑이 우상단
bottomLeft = pts[np.argmax(diff)] # x-y가 가장 큰 값이 좌하단
pts1 = np.float32([topLeft, topRight, bottomRight, bottomLeft])#변환전 4개 좌표
w1 = abs(bottomRight[0] - bottomLeft[0])#하단 좌우 좌표간 거리
w2 = abs(topRight[0] - topLeft[0])#상단 좌우 좌표간 거리
h1 = abs(topRight[1] - bottomRight[1])#우측 상하 좌표간 거리
h2 = abs(topLeft[1] - bottomLeft[1]) # 좌측 상하 좌표간 거리
width = int(max([w1, w2])) # 좌우 최대값
height = int(max([h1, h2])) #상하 최대값
pts2 = np.float32([[0,0], [width-1,0],
[width-1,height-1], [0,height-1]]) #변환후 4개 좌표
mtrx = cv2.getPerspectiveTransform(pts1, pts2) #변환 행렬
result = cv2.warpPerspective(img, mtrx, (width, height))#결과 윈도우
cv2.imshow('scanned', result)
cv2.imshow(win_name, img)
cv2.setMouseCallback(win_name, onMouse)
cv2.waitKey(0)
cv2.destroyAllWindows()
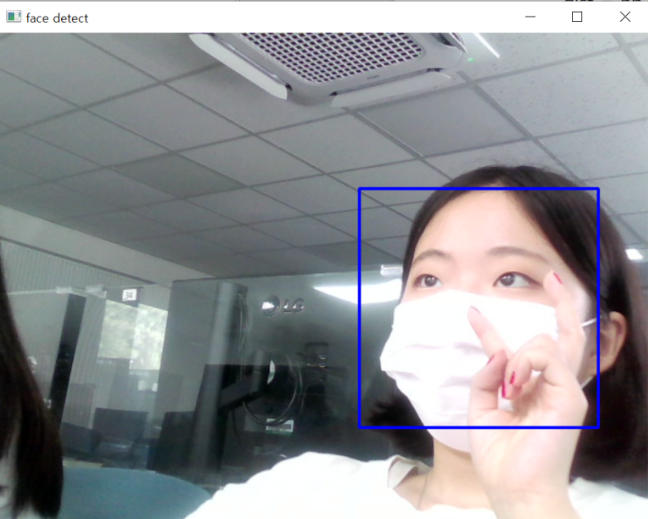
5. 얼굴인식
import cv2
import numpy as np
def preprocessing(coin_no):
fname = "images/coin/{0:02d}.png".format(coin_no)
image = cv2.imread(fname, cv2.IMREAD_COLOR)
if image is None:
raise Exception("영상 파일 읽기 에러")
gray = cv2.cvtColor(image, cv2.COLOR_BGR2GRAY) # BGR → Grayscale
gray = cv2.GaussianBlur(gray, (7, 7), 2, 2) # GaussianBlur(img, 커널(x, y), 표준편차 x, y)
flag = cv2.THRESH_BINARY + cv2.THRESH_OTSU # 오츠(otsu) 이진화
ret, th_img = cv2.threshold(gray, 130, 255, flag) # threshold(img, th, thmax, type), ret → 임계값, th_img → 이진영상
mask = np.ones((3, 3), np.uint8) # 마스크 생성
th_img = cv2.morphologyEx(th_img, # 입력 img
cv2.MORPH_OPEN, # 모폴로지 열림
mask) # mask
return image, th_img
def find_coins(image):
results = cv2.findContours(image, # img
cv2.RETR_EXTERNAL, # 검색 방법
cv2.CHAIN_APPROX_SIMPLE) # 근사화 방법
contours = results[0] if int(cv2.__version__[0]) >= 4 else results[1] # 해당 버전으로 가져오기
circles = [cv2.minEnclosingCircle(c) for c in contours] # 외곽 원 최소값 검출
circles = [(list(map(int, center)), int(radius)) for center, radius in circles if radius>25]
return circles
image, th_img = preprocessing(70)
if image is None:
raise Exception("영상 파일 읽기 에러")
circles = find_coins(th_img)
for center, radius in circles:
cv2.circle(image, center, radius, (0, 255, 0), 2)
cv2.imshow("preprocessed image", th_img)
cv2.imshow("coin image", image)
cv2.waitKey(0)
cv2.destroyAllWindows()
6. 동전 인식
import cv2
import numpy as np
def preprocessing(coin_no):
fname = "images/coin/{0:02d}.png".format(coin_no)
image = cv2.imread(fname, cv2.IMREAD_COLOR)
if image is None:
raise Exception("영상 파일 읽기 에러")
gray = cv2.cvtColor(image, cv2.COLOR_BGR2GRAY) # BGR → Grayscale
gray = cv2.GaussianBlur(gray, (7, 7), 2, 2) # GaussianBlur(img, 커널(x, y), 표준편차 x, y)
flag = cv2.THRESH_BINARY + cv2.THRESH_OTSU # 오츠(otsu) 이진화
ret, th_img = cv2.threshold(gray, 130, 255, flag) # threshold(img, th, thmax, type), ret → 임계값, th_img → 이진영상
mask = np.ones((3, 3), np.uint8) # 마스크 생성
th_img = cv2.morphologyEx(th_img, # 입력 img
cv2.MORPH_OPEN, # 모폴로지 열림
mask) # mask
return image, th_img
def find_coins(image):
results = cv2.findContours(image, # img
cv2.RETR_EXTERNAL, # 검색 방법
cv2.CHAIN_APPROX_SIMPLE) # 근사화 방법
contours = results[0] if int(cv2.__version__[0]) >= 4 else results[1] # 해당 버전으로 가져오기
circles = [cv2.minEnclosingCircle(c) for c in contours] # 외곽 원 최소값 검출
circles = [(list(map(int, center)), int(radius)) for center, radius in circles if radius>25]
return circles

import cv2
import numpy as np
from header.coin_preprocess2 import *
image, th_img = preprocessing(70)
if image is None:
raise Exception("영상 파일 읽기 에러")
circles = find_coins(th_img)
for center, radius in circles:
cv2.circle(image, center, radius, (0, 255, 0), 2)
cv2.imshow("preprocessed image", th_img)
cv2.imshow("coin image", image)
cv2.waitKey(0)
cv2.destroyAllWindows()

'컴퓨터비전&AI' 카테고리의 다른 글
| [논문리뷰였던것] Deep learning-guided video compression for machine vision tasks 였지만 VVC 이론. (0) | 2025.02.12 |
|---|---|
| NeRF: Neural Radiance Fields (0) | 2024.12.22 |
| [배울랑교AI] 영상 처리 (0) | 2024.11.27 |
| [AI배울랑교] 컴퓨터 비전 (2) | 2024.11.27 |
| [배울랑교 AI] 컴퓨터 비전 기능을 구현 (0) | 2024.11.27 |